Migrating to Krystal from a non-cPanel host should be a breeze - we have a number of tools to help with the process.
If you're website uses one of the popular Content Management Systems (CMS) like WordPress, Joomla or Drupal then you can take advantage of our Software Application Installers - Softaculous and Installatron. Both of these offer site import features that can connect to your current site and pull a full clone of it to your new Krystal account.
Files - these include things like html files, php scripts, images (jpg, gif, png etc), css files and so on.
Databases - these are usually required for most modern websites based on Content Management Systems like WordPress, Joomla, Drupal, forum systems, and eCommerce applications. Krystal offer MySQL database services, which is the most commonly used database platform for linux based web hosting.
The trick in a successful move is getting all of this stuff transferred without losing anything along the way.
If you don't already have a Krystal cPanel account, then now is the time to purchase one! Head over to our website (link opens in a new window) and sign up to one of our plans.
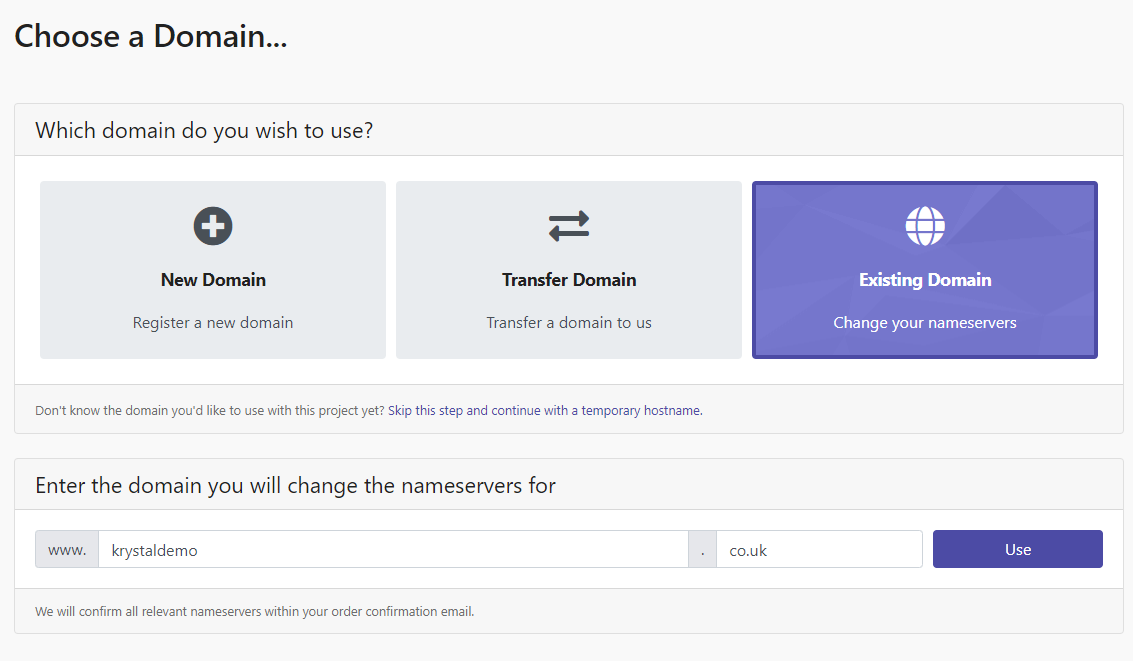
Purchasing your Krystal cPanel account While purchasing your Krystal cPanel account, you will be asked about which domain name you wish to associate with your cPanel account. You can make the following choices: - Register a new domain - You can of course register a new domain, but if you are transferring a website, then you probably want to keep the existing domain and choose from 2, or 3 below. - Transfer your domain from another registrar - Choose this if you want to move your domain to us, so that you pay us for renewals in future. - I will use my existing domain and update my nameservers - Choose this if you intend to leave your domain with the existing registrar, and just reconfigure it to point at our nameservers.If you choose your website's existing domain name, that's fine (and recommended!) - this doesn't mean that your website will suddenly stop working, it just tells our systems to get ready to serve a website under your production domain. Continue through the purchase process in the normal way and your account will be created once you have paid.
Backup your files Most hosting providers will offer you a way of backing up your website's files. This will often mean that you end up downloading a file with a zip, tar, tar.gz, or tgz extension to your computer. The file may be quite large and may take some time to download, so be patient. Please also ensure this process completes successfully - your current host may limit your disk space and if it fills up before the zip file is fully created you'll end up with a corrupt backup. If you find this happens you'll need to download the files to your local computer using an FTP client as described below. If your hosting provider does not offer you any such tools, then you will have to connect to your web space using a suitable FTP application. Your website files will normally be located in a directory called public_html or htdocs. Just download the entire directory to your local computer. Make absolutely certain, you have copied everything because a single missing file could mean your site won't work once transferred. Once you have downloaded all of the files, then pack them into a zip or tgz archive.
If you have to use the FTP method, then please make sure that your FTP software is set to show hidden files (on Linux, hidden files all have names that begin with a dot e.g. .htaccess)
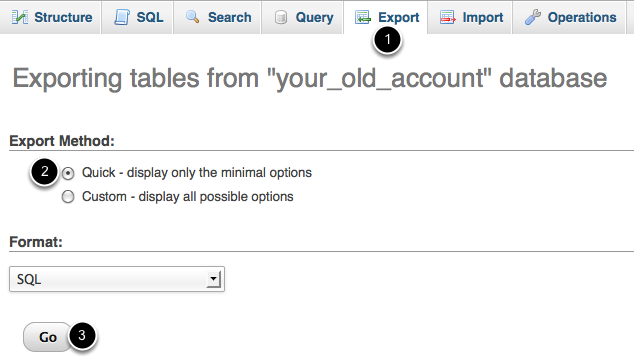
Backup your databases using phpMyAdmin Most websites only require a single database, but just in case yours has more, be sure to backup each one of them. Again, most hosting providers (I would say all here as it really is essential) offer a way for you to dump (this sounds kind of drastic, but it leaves your existing database unaffected - it just takes a copy) your databases to an export file (usually with an sql extension).Quite often, the provided tool is called phpMyAdmin, a popular web based MySQL management tool. Once you have selected your database in phpMyAdmin, just click the Export tab (as shown below), and go for the Quick Export Method. In the vast majority of cases you can just hit the Go button, and the file you download will be perfectly suitable for importing into your new Krystal account. So for now, let's just hit Go and download the dump file.
Upload your files to Krystal There are a couple of options here.
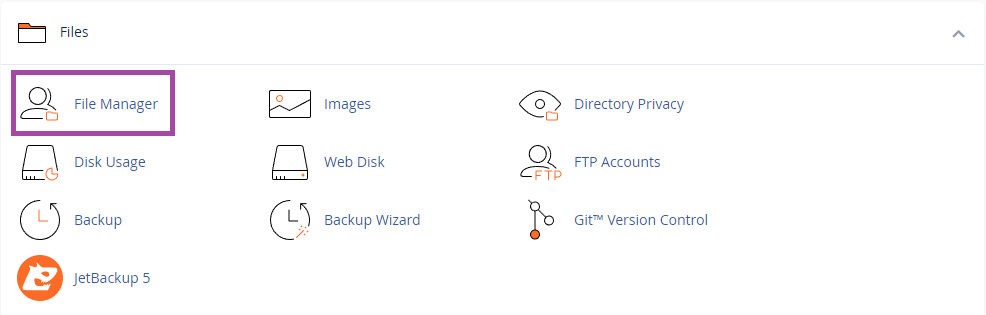
Archive file less than 250Mb If your file backup archive is less than 250Mb then you can use the file upload function that is part of the File Manager (link opens in a new window) facility built into your cPanel account. Log into your cPanel account using the temporary connection details given in your Welcome email. Once logged in, click on the File Manager icon in the Files section.Once in the file manager, click Settings on the top right.
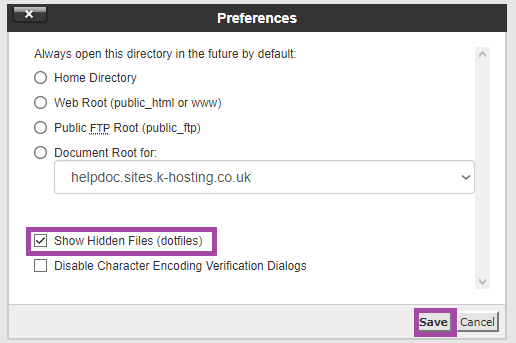
Tick Show Hidden Files (dotfiles) and then click Save.
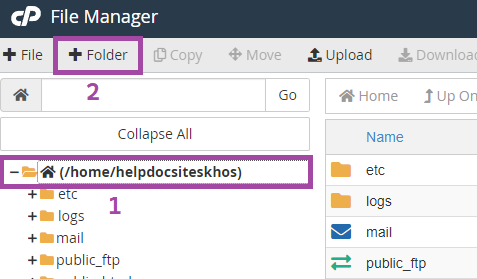
Once File Manager is open, make sure your home directory is selected (1) and then click the New Folder button (2) to create a temporary folder.
Note: Folder and Directory are interchangeable terms - for some reason the technology industry can't make its mind up which to use!
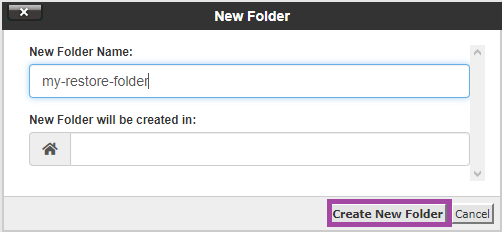
Create a new directory (the example shown creates a directory called my_restore_folder) by entering a name in New Folder Name. Leave the New Folder will be created in box blank. Click Create New Folder.
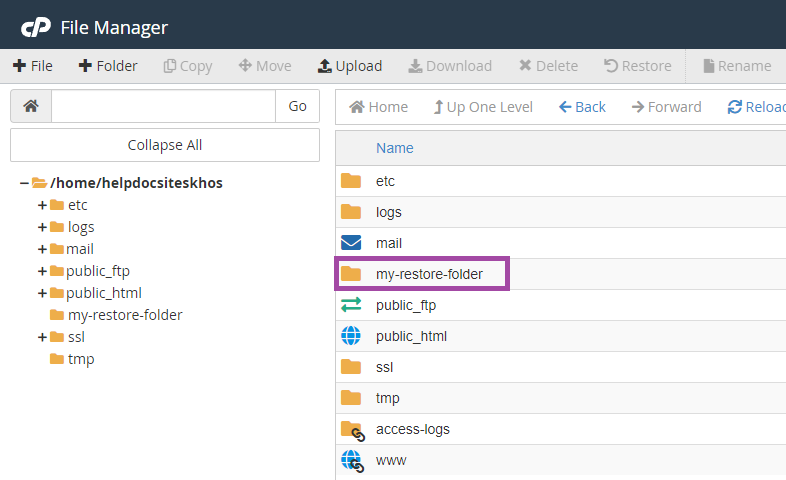
Select the newly created folder from the list of folders.
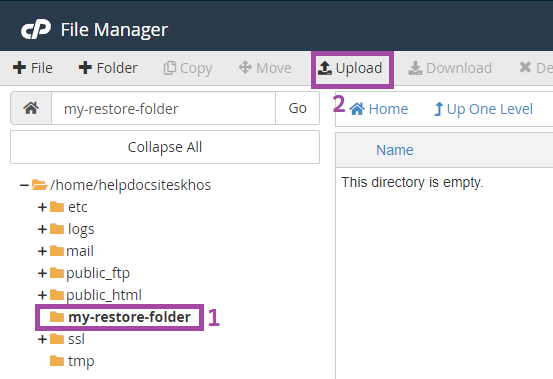
Check that you are in the correct folder (1), Click Upload.
The file upload screen will now appear. Leaving all the default settings, click the Browse button and choose the backup file from your computer's local storage. Once you select the file it will immediately begin uploading. Once the file has finished uploading return to the main File Manager screen.
Continue to step 5.
Archive file bigger than 250Mb For bigger archives you'll need to use FTP software to connect to your new Krystal hosting and upload the archive file. We have a separate guide on using FileZilla to connect to Krystal (link opens in a new window). Using your FTP software create a temporary directory in your home directory and upload into it the packed zip, or tgz archive you created in Step 2. Once you have uploaded your file, continue to Step 5.
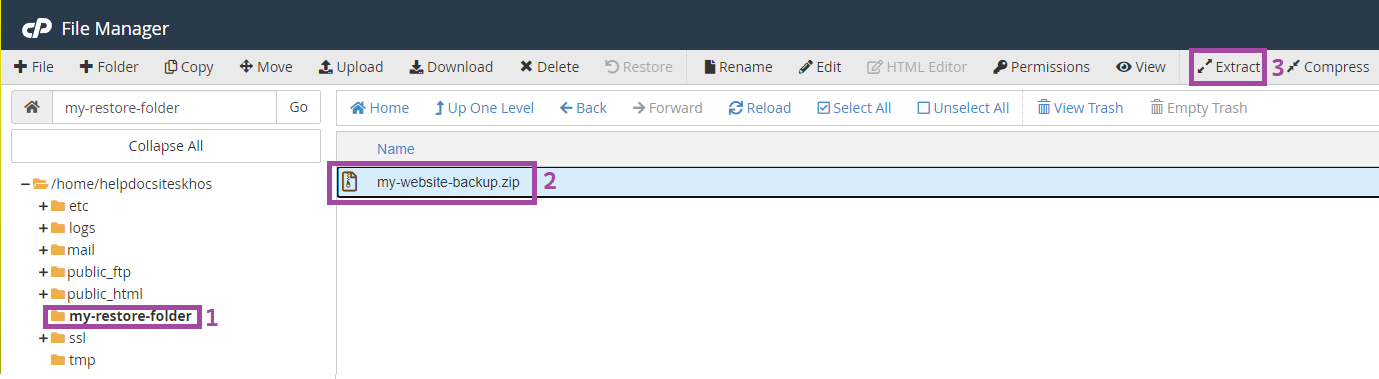
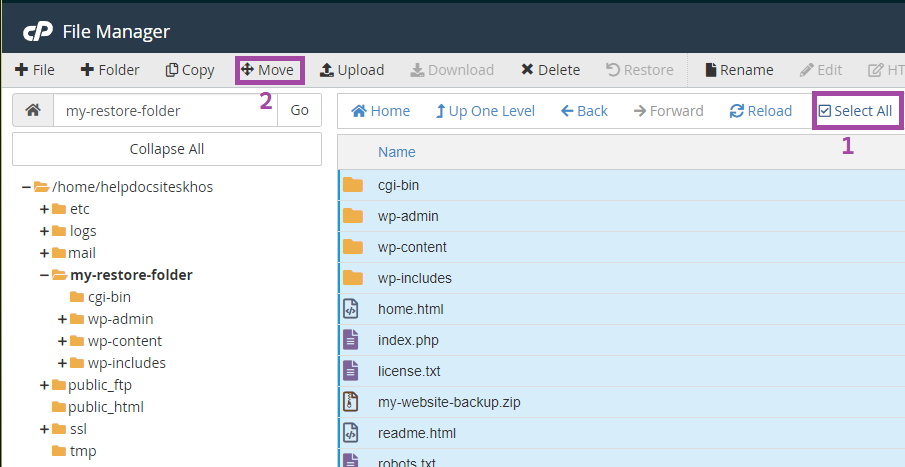
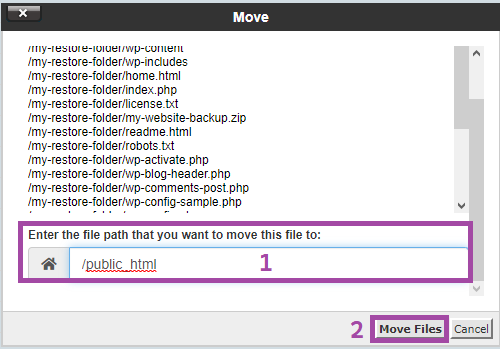
Using File Manager, click the folder (1) and backup file (2) you just uploaded, and click the Extract button (3).Once the files have been unpacked, you need to move them into your public_html directory (or the physical root of your addon domain if you are restoring an addon domain). The extracted files may have been placed directly into your temporary directory or into a sub-directory. Whichever, locate your website files, and then click the Select all (1) tick box. Then click the Move File button (3).Make sure the path is set to the public_html directory (as shown - 1), or to the physical root of your addon domain. Then, click the Move Files button (2) to finally move your files into their new home! Remember to start your path with a forward slash as shown.
Adjusting your web application's configuration files Most websites that use a database have a special configuration file that stores the details of the database server location, database name, and username. It is likely you will have changed the database name and/or database username once you have restored your database into your cPanel account. Therefore it is usually necessary to update the configuration of your web applications to connect to the database under its new name, and perhaps via a new username/password. While we can't give you an exhaustive guide to reconfiguring every system out there, here are the locations of some common configuration files. WordPress - wp-config.php Joomla! - configuration.php Drupal - sites/default/settings.php Magento - app/etc/local.xml osCommerce - includes/configure.php SMF Forums - settings.php Once you have made these changes, your application should continue to work normally. You can test your newly copied website before you change your domain names nameserver settings by following our guide How do I view my website to test it before changing my name server DNS? (link opens in a new window).
The final step once you're happy your migrated site and all other aspects of your new hosting are working correctly would be to make any final changes to your DNS - setting your domains nameservers or pointing your domain to your new Krystal server.